Sagen AI Designer - Reference Guide
Persona
Create your Sagen AI Assistant by giving it a name and brief background story. Pick an avatar character and assign a unique voice and personality traits. After you select your assistant’s avatar, you can preview your changes by tapping your Assistant’s thumbnail and pressing the START button to speak to it. Ask your assistant any question. And make your revisions and test them easily on this screen.
Basic Settings
Name
The name of your Assistant.
Short Description
This is a short description that is shown in the My Assistants page. This is not shown to any of your users or used by your assistant. This field is for description purposes only and can be used by you to distinguish between other assistants that you have setup with the same name or similar look.
Use Case
Choose the best option based upon how you intend to use your Sagen AI Assistant:
- Personal Assistant: A general purpose assistant who helps you find answers to questions. Select this assistant if you want to build an Alexa/Siri like assistant and connect it to ChatGPT and optionally to a custom data source.
- Shopping Assistant: A sales assistant who helps you discover and shop for new products. Select this assistant if you are looking to build an ecommerce application and connect your assistant to a product database.
The use case that you select will determine the behavior of your Assistant. You can change or customize this behavior by customizing prompts on step 3 Prompts. If you edit your LLM Prompt, your use case will automatically default to “Custom Use Case.”
Assistant’s Bio and Purpose
Give your assistant a background story and describe what your assistant’s purpose is. Be creative here and experiment with giving your Assistant specific skills, personality quirks, and domain expertise. For example, if you are designing a “Travel Assistant” you can list out the places your Assistant has traveled, his favorite places to visit, interests and passion for specific types of food and knowledge of time periods and cultures. Use the preview feature to test out your Assistant’s background by asking it different questions related to what you write in this field. Have fun!!
Greeting Message
This is what your assistant first says right after you tap the START button. TIP: Keep this short and inform your users what your assistant is here to help out with.
Avatar
Pick the avatar character that best visualizes your Assistant. Premium Avatars require a paid subscription. We are releasing more Avatar characters and the ability to create your own Avatar character soon!
Custom designed human or cartoon avatars are available to Enterprise customers. Please contact us at support@sagen.ai for details.
Voice
Pick the voice of your assistant. To preview a voice press the play button or tap the START button on your assistant to ask it a question.
Custom designed voices are available to Enterprise customers. Please contact us at support@sagen.ai for details.
Personality
Select up to three personality traits to make subtle tweaks to the choice of words and tone your assistant uses to respond to questions. Once you have selected three traits, you must first unselect a trait by tapping on it to select a different trait.
Data
This tab allows you to connect data stored in a vector database such as Pinecone with your Sagen AI Assistant. Connecting your own data is available to paid plans only.
Example Data Sources
The Sagen AI Designer provides an example Pinecone data source named “Example: Mike’s Burgers Menu” which contains a product catalog of a fictionalized hamburger restaurant. You can use this data source as a way to test building your own ecommerce or dining assistant. To make best use out of this data source, select the “Shopping Assistant” use case in the Persona tab. Once connected to the Mike’s Burger data source, you can ask your assistant to take your order and add items to your cart. See the Mike’s Burger demo app to try it out for yourself.
Creating a New Data Source
Give your data source a name and description to help you uniquely identify it in the My Data tab. Select either Pinecone or GroundX as the data source type.
Pinecone
- Pinecone Index: This is the name of your vector index.
- Pinecone API Key: This value can be found by clicking on the “API Keys” menu item in the Pinecone Dashboard.
- Pinecone Environment: This value must match the “Environment” field that is mapped to the API Key entered in the field above and as displayed in the “API Keys” page in the Pinecone Dashboard.
GroundX
- GroundX ID: The unique ID of the database index as found in the GroundX dashboard.
- GroundX API Key: The GroundX API Key which must have access privileges to the index specified in the field above.
Object Definitions
This textarea allows you to map the metadata fields returned by your Pinecone query to a Sagen JSON object that is automatically injected into the LLM Prompt. This field requires you to specify a JSON object with special fields for indicating the id and name of the objects returned from your Data Source query.
Example JSON definition
1 2 3 4 5 6 7 8 9 | {
"your_object_name": {
"your_optional_id_property": "id",
"your_optional_name_property": "name",
"your_object_property1": "",
"your_object_property2": "",
"your_object_property3": ""
}
}
|
To create your JSON mapping, copy the example above and replace your_object_name with a descriptive name of the types of objects that are returned from your data source. For example, if your database contains a list of products, then replace your_object_name with products as the variable name. Additionally for each property that you would like included as input to the LLM query, replace the your_ property names with the actual property field names that are returned by your data source query. For example, if your products contain pricing and description information, then your properties would be defined as price and description. You can map an unlimited number of fields by adding additional properties.
For most properties, you will set its mapped value to empty string. To indicate that a property is the name or unique id of the object, specify name or id respectively. For example, for a product database, define the SKU as the unique ID of your object as such: “sku”: “id”. By specifying a unique id for your object, you are indicating that the object and all of its mapped properties will be passed back to your application in the event stream as part of the metadata array. Please see the JavaScript SDK documentation for additional details.
Mike’s Burger Example Object Definition
1 2 3 4 5 6 7 8 9 | {
"product": {
"sku": "id",
"name": "name",
"price": "",
"category": "",
"description": ""
}
}
|
Test Console
Test that your data source works correctly and that you have mapped your object definitions correctly by entering a query string in the text field and pressing the Test button. The query string should be a question that your end user will ask your assistant that is used to search your vector database for a relevant answer, document, or product. For example, when querying the Mike’s Menu Items - Example Data, you can use “I’d like to order a double cheeseburger” as your test query.
Prompt
This tab allows you to edit your LLM Prompt. Prompts are used to control the behavior and objectives of your Assistant. Editing your prompt gives you fine grained control over every aspect of how your Assistant interacts with your end users. To edit your Prompt, you must upgrade to a paid plan.
LLM
Sagen AI Assistants use ChatGPT as their default LLM. Enterprise customers on an annual subscription plan may specify a custom LLM. Contact us at support@sagen.ai for details.
System Prompt
Upgrade to a paid plan to edit the ChatGPT system prompt. We recommend that you use OpenAI’s Playground tool to first create and edit your prompt. Once you are happy with the results, copy and paste your system prompt into this textarea.
User Prompt
The default user prompt provides the LLM with user history and context for your end user’s interaction with your Assistant. For most use cases, we suggest you use the default prompt. In order to edit your user prompt, you must first upgrade to a paid plan. We recommend that you use OpenAI’s Playground tool to first create and edit your prompt. Once you are happy with the results, copy and paste your user prompt into this textarea.
Sagen AI Macros
You may reference the following macros in your system or user prompts:
- {{name}} : the name of your Assistant as defined in the Persona tab
- {{traits}} : the list of personality traits selected in the Persona tab
- {{bio}} : your Assistant’s bio as defined in the Persona tab
- {{context}}: the custom data object definitions returned from a data source attached to your Assistant.
- {{history}}: the end user’s past conversation history
- {{input}} : the end user’s current question
Deploy
This tab allows you to customize how the UI controls of your AI Assistant look to match the theme of your website and generate code to embed your Sagen Assistant to your website.
UI Customizations
Customize the look and feel of the UI controls of your Assistant.
Primary Color
This is the main color of the START button and Mic button.
Secondary Color
This is the color of the Closed Caption (CC) and Keyboard buttons to the left and right of the main mic button.
Foreground Color
This is the foreground color of the mic, start, closed caption, and keyboard buttons.
Font Face
This is the font face of the START button.
Avatar View
How much of the body you want your assistant to display. * Torso * Head * Full Body
Hide Avatar on Start
Select YES if you would like to hide the Assistant behind a START button.
Hide Sagen AI Branding
Select YES if you would like to hide the “Powered by Sagen AI” text underneath the START and UI buttons.
Code
Allowed Domains
Enter a list of domains of website addresses on which your Assistant will be installed. For example if the URL to the webpage on which your Assistant will reside is https://www.mywebsite.com/my-assistant, then the domain is “www.mywebsite.com.” List multiple domains on a single line.
Code Snippet
Copy the unique HTML code snippet assigned to your Assistant and paste it into your HTML document right before the closing </body> tag. Replace the CSS element selector reference “#app” with the id of the CSS element in which you want your Assistant to display. Your Assistant will inherit the width and height of the enclosing CSS element.
Example Code Snippet (Do Not Use)
<script>
(function (s,a,g,e,n) {
        s['sagen'] = function () { (s['sagen'].q = s['sagen'].q || []).push(arguments) };
        e = a.createElement('script'), n = a.getElementsByTagName('script')[0];
        e.id = 'sagen'; e.src = g; e.async = 1; n.parentNode.insertBefore(e, n);
}(window, document, 'https://test-assets.sagen.ai/sdk/1.0.15/sagen-avatar.min.js?id=xxxxxx-xxxxxxxx-xxxx-xxx-xxxxxxxxxx&token=xxxxxxxxxxxxxxxxxxxxxxxxxxxxxxxxxxxxxxx'));
sagen('config', {
element: '#app', // put a valid element CSS selector here
});
</script>
HTML/CSS/JS Example Implementation
For an example implementation of an Sagen AI Assistant, visit our Demo Personal Assistant App here using a Desktop browser such as Chrome or Firefox. This demo application shows you how to embed your Sagen Assistant as a full screen element on your webpage. You may also add a Chat history and buttons to invoke animations using the JavaScript SDK supported by your Sagen AI Assistant.
To use the demo code, view the HTML source or from the file menu, select the Save As… menu option and save the complete webpage to your computer. Open the .html file in a text editor, search for the keyword “sagen” to find the JavaScript snippet of the Sagen embed code. Replace the script section with the unique deploy code for your own Assistant. Save and modify the HTML code for your own purposes and publish to your web server.
Using SquareSpace to Create Your Website
If you do not have experience coding HTML or building a website yourself, we recommend using SquareSpace.com to create one. Signup for a SquareSpace account and on your home page, you can embed your Sagen Assistant by tapping the “ADD BLOCK” button and choosing the “Embed” component. Select embed as “Code Snippet” and copy and paste the code snippet from your Sagen AI Assistant into the text area in the SquareSpace Embed block. Immediately above the Sagen code snippet, add the following HTML code: <div id=”app”></div>.
Example SquareSpace Embed Block
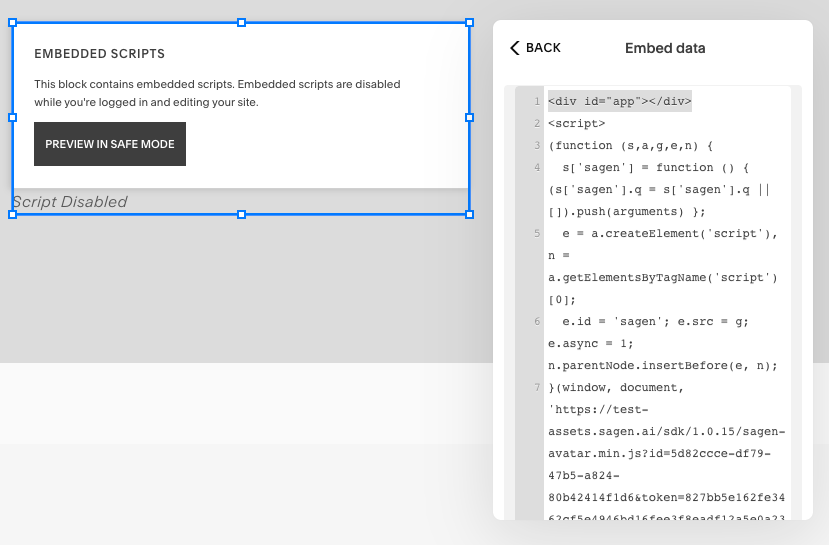
Save your embed block in SquareSpace. To resize your Sagen AI Assistant, you can drag the sides of the Embed block in the SquareSpace editor. Publish your page and you will see your Sagen Avatar. See SquareSpace’s documentation to further customize your webpage.